- Print
- DarkLight
- PDF
Article summary
Did you find this summary helpful?
Thank you for your feedback!
Configuration Settings
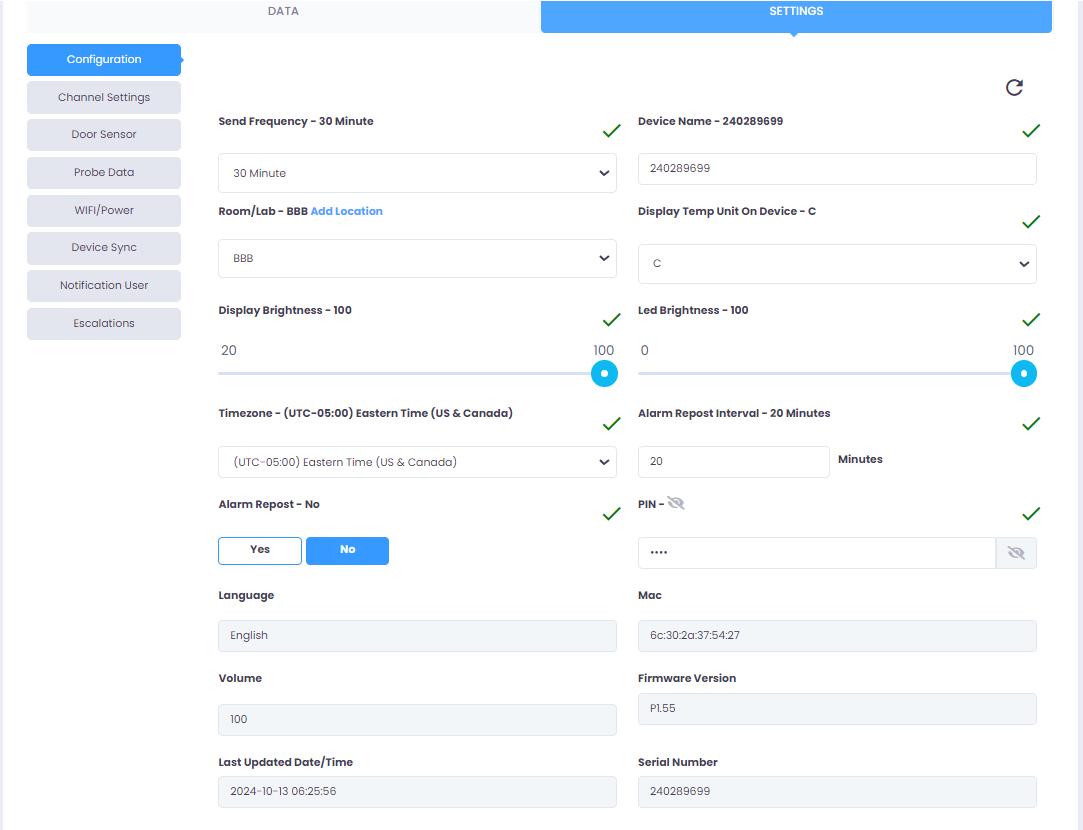
The Configuration Settings section allows users to configure key aspects of the device, including sending frequency, display brightness, temperature unit settings, time zone, alarm repost interval, and more. This section helps users personalize their device for specific environments and preferences.
IMPORTANT!
To ensure that your Configuration settings are saved both on the web application and synced automatically with the device, make sure the device is connected to both Wi-Fi and Power during the process. Without these connections, the changes will only be saved on the web application.

Field Insights
Accessing Configuration Settings:
- Login into the TraceableLIVE® account.
- Select a device from the device list.
- From the Settings menu, navigate to Configuration Settings.
Send Frequency:
- Select how often the device should send data to the server.
- User can select intervals such as 5 minutes, 10 minutes, 15 minutes, 30 minutes & 60 minutes .
- This determines how frequently the device sends logged data.
Device Name:
User can set a unique device name for internal identification purposes.
Room/Lab Location:
- Add or edit the location of the room or lab where the device is being used.
- Click on Add Location and enter the room or lab name or select a location from the dropdown.
- This helps identify the device’s physical location, which is especially useful when multiple devices are in use across different areas.
Display Temp Unit On Device:
- Select the preferred temperature unit for display on the device.
- User can choose between Celsius (C) or Fahrenheit (F).
Display Brightness:
- User can adjust the brightness of the device's display.
- User can use the slider to set a value between 20 and 100.
- This setting ensures optimal visibility based on the lighting conditions in the environment where the device is being used.
LED Brightness:
- User can adjust the brightness level of the device’s status LED indicator.
- User can use the slider to set a value between 0 and 100.
- This setting allows users to control the brightness of Status LED light based on their preferences or environmental needs (e.g., dimmer settings in darker environments).
Time zone:
- User can select the appropriate time zone for the device.
- User needs to choose the correct time zone from the dropdown list.
Alarm Repost Interval:
- User can set the interval for how often the device should repost an alarm notification.
- User needs to enter the interval in minutes.
Alarm Repost:
- User can enable or disable the reposting of alarms.
- This option determines whether alarms should repost at set intervals if the alarm condition remains unresolved.
PIN:
- User can view or update the security PIN for the device.
Language (View Only):
- Displays the current language used for the device interface.
Mac (View Only):
- Shows the device’s MAC (Media Access Control) address.
Volume (View Only):
- Displays the current alarm/alert volume level set for the device.
Firmware Version (View Only):
- Displays the current firmware version installed on the device.
Last Updated Date/Time (View Only):
- Shows the date and time when the device settings were last updated.
Serial Number (View Only):
- Displays the device’s unique serial number.
NOTE
- After making the necessary changes, click Update to save all the configurations.
- Wait for 15 seconds to sync the updated settings to the device.
- After 15 seconds, check the updated fields for a green tick mark, indicating that the settings have been successfully updated.
- If a red error icon is displayed, ensure the device is connected to Wi-Fi and Power, and try updating the settings again.
Was this article helpful?


